
Webtoon panel splitting: why the last panel is taller
Contents
When you split a long vertical webtoon page or card-news image into several files for upload, simply dividing the total height by the number of panels often leaves the last file with a different height. This isn't a calculation mistake. It's an unavoidable result of division leaving a remainder. Once you understand why, you can place Photoshop guides accurately by hand, too.
Summary ① If the original height doesn't divide evenly by the number of panels, you get a quotient and a remainder. You have to add the whole remainder to the last panel so you don't lose a single pixel of the original. ② If you add spacing (gaps) between panels, the positions where you cut them from the original (source coordinates) are different from the positions where the panels sit in the finished image (output coordinates). ③ Depending on the spacing mode (between panels only / bottom / top and bottom), the total height of the final image grows by a different amount.
The Problem: Why Only the Last Panel Ends Up a Different Height
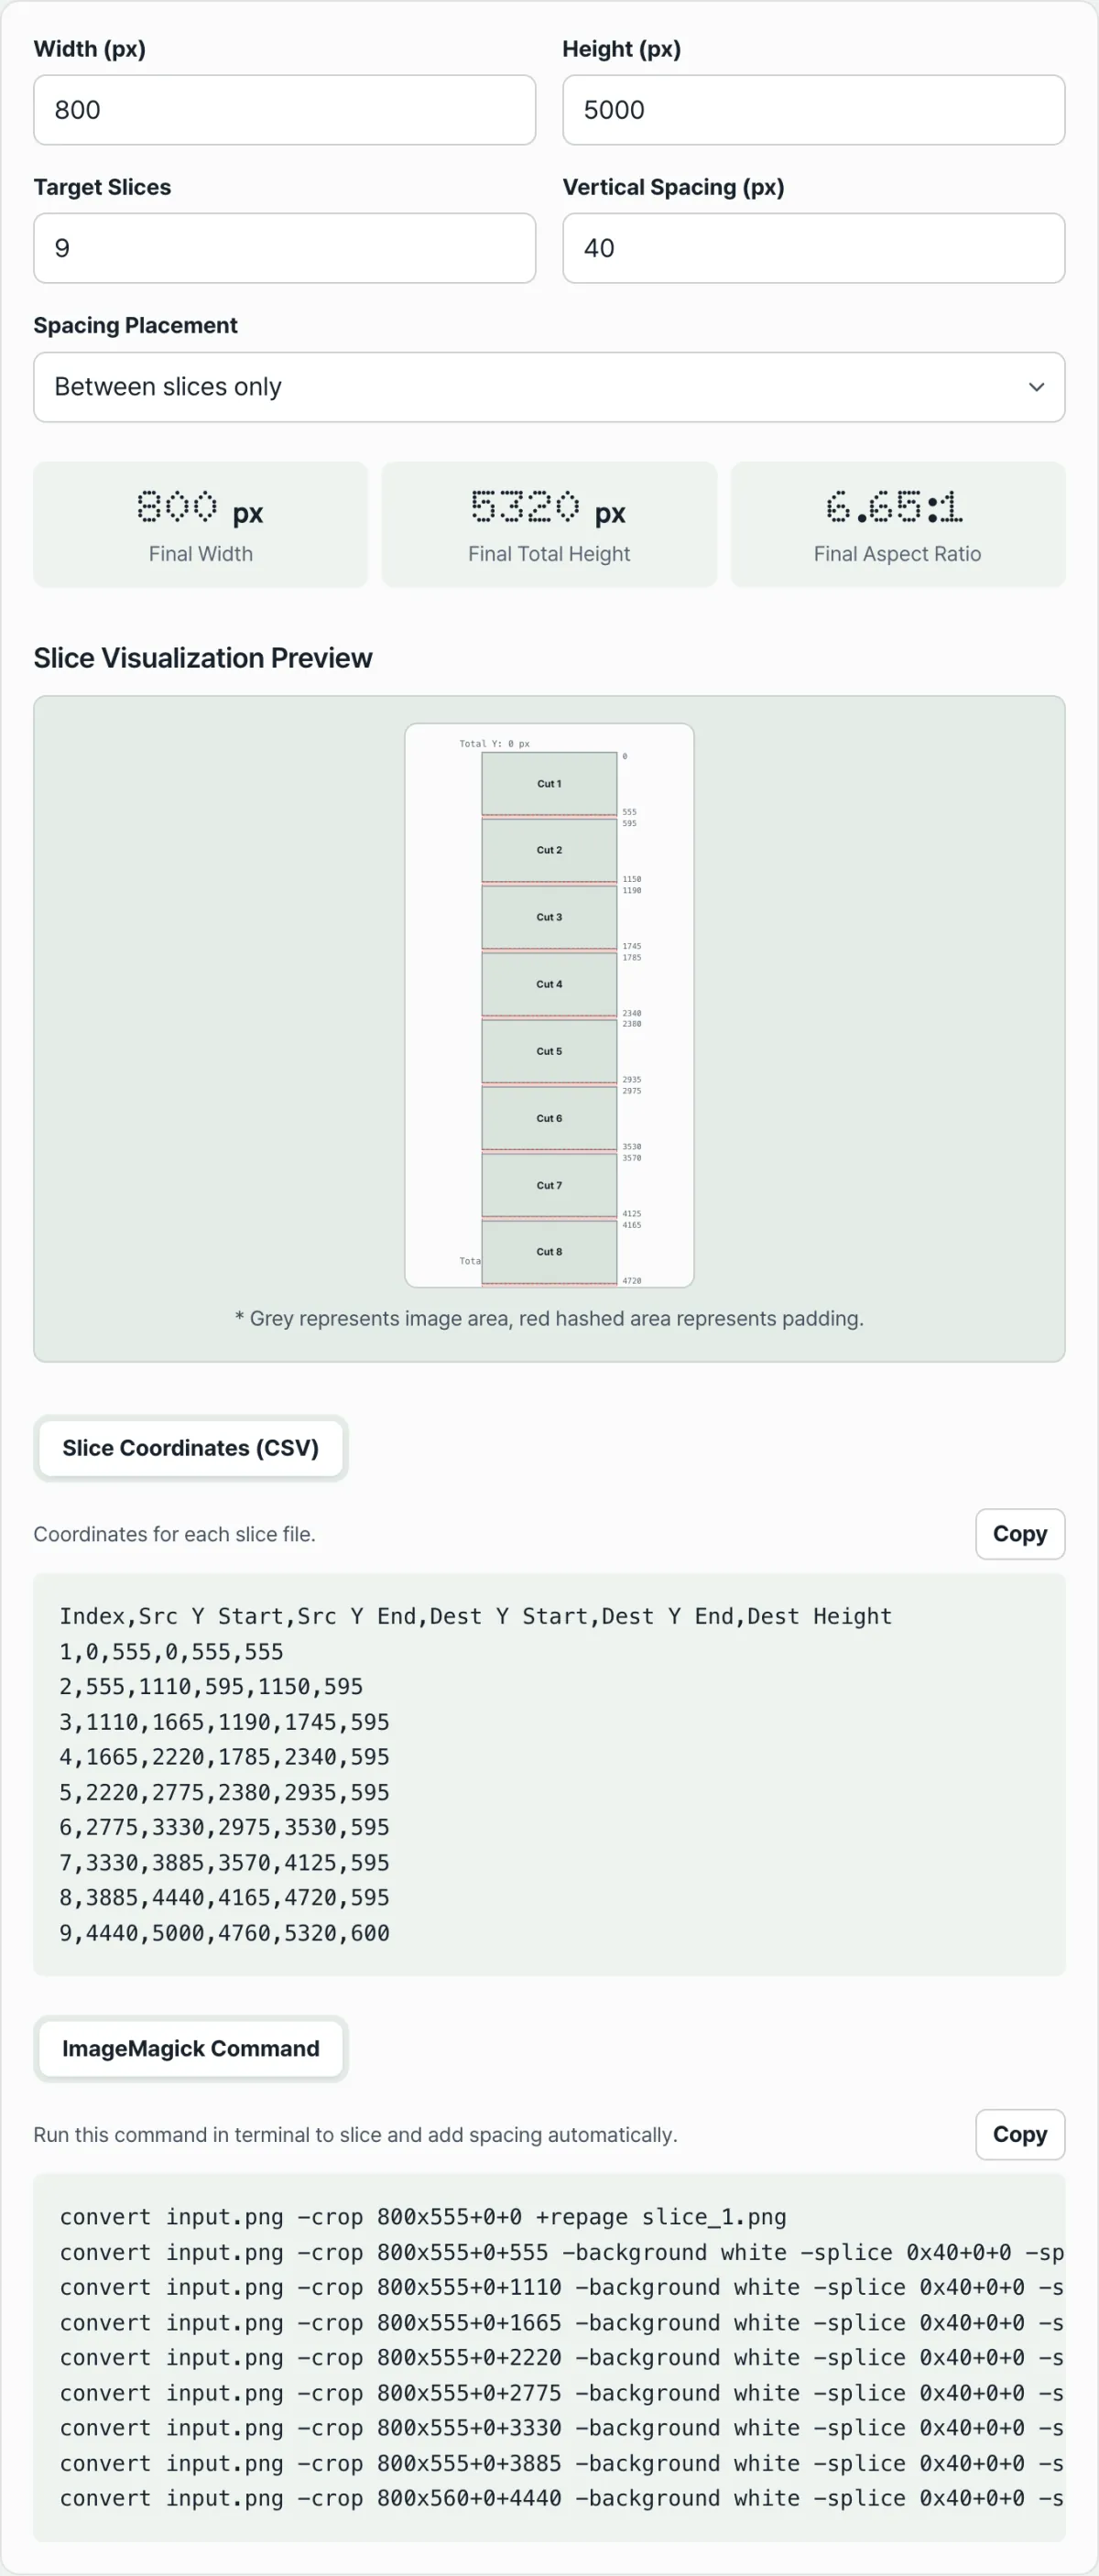
Let's say you're splitting a webtoon page that's 5000px tall into 9 panels. 5000 ÷ 9 = 555.55…, which doesn't divide evenly. If you cut each panel at 555px, you get only 555 × 9 = 4995px, so the bottom 5px of the original gets cut off and lost.
To prevent that, you need to add the leftover 5px to one panel. If you round 555.55px every time you place a guide by hand, the rounding error builds up panel by panel, and near the last panel your guides will be off by several pixels from the original.
There is only one way to use whole pixels and still keep every pixel of the original. Cut 8 panels at the quotient (whole number), and add the entire remainder to the last panel. Then panels 1 through 8 are 555px, and only the 9th and final panel is 560px, for a total of exactly 5000px.
The Fix: Calculating It Directly with the Quotient and Remainder
The formula is simple. Divide the original height by the number of panels and round down to get the quotient, called base. Subtract base × the number of panels from the original height to get the remainder. Cut all the earlier panels at base height, and add the remainder to the last panel only.
To add spacing between panels as well, you need one more set of coordinates. The start and end positions you cut from the original (source Y coordinates) are different from the start and end positions where that panel sits in the finished image, including the spacing (output Y coordinates). The more spacing you add, the farther the output coordinates shift down from the source coordinates.
Placing guides by hand one at a time in Photoshop or Clip Studio Paint and keeping the two coordinate systems in sync is a hassle. Check your numbers with our free Webtoon Panel Slicing & Spacing Calculator. Just enter the number of panels, spacing, and spacing mode, and it produces a table of source and output coordinates for each panel, plus an ImageMagick script you can copy and paste without changes.
Free · no sign-up · generates panel coordinates and an ImageMagick script for you
How Much the Final Height Changes with Each Spacing Mode
There are three ways to add spacing between panels: between panels only, at the bottom of every panel, and at the top and bottom of every panel. All three leave the original height as is and insert the spacing only into the output coordinates, but the total height each one adds is different.
Spacing between panels only adds (number of panels − 1) × spacing. Spacing at the bottom of every panel adds number of panels × spacing, and spacing at the top and bottom of every panel adds (number of panels + 1) × spacing. For 9 panels with 40px spacing, that's 320px, 360px, and 400px added to the original height, respectively.
If you set your upload specs based only on the original height without accounting for this added height, you'll discover too late that the finished files are longer than expected. Webtoon portals usually recommend a width of 690–800px and a height of no more than 10,000px per file, so it's safer to double-check the total height after adding spacing.
Common Sticking Points
| Situation | Why it's a problem | What to check |
|---|---|---|
| Placing guides repeatedly at a decimal value such as 555.55px | Rounding every time builds up error, so the last panel boundary ends up off | Did you first calculate the difference between the quotient (whole number) × number of panels and the original height (the remainder)? |
| Adding spacing but looking only at the source coordinates | Source and output coordinates differ, so the actual panel positions in the finished file get thrown off | Did you also check the output Y coordinates (based on the finished image)? |
| Not measuring the total height again after adding spacing | The added total height may exceed the upload limit | Did you account for the increase for each spacing mode ((N−1)·N·(N+1)×spacing)? |
Recap
- If the original height doesn't divide evenly by the number of panels, there's a remainder. Add that entire remainder to the last panel so you don't lose a single pixel of the original.
- When you add spacing, the positions you cut from the original (source coordinates) differ from the positions where the panels sit in the finished image (output coordinates).
- The total height the finished image gains depends on the spacing mode — between panels only (N−1) × spacing, bottom (N) × spacing, and top and bottom (N+1) × spacing.
- If you don't account for the added total height, you may exceed the upload limit (maximum height). Check the total height again after adding spacing.
Free · no sign-up · generates panel coordinates and an ImageMagick script for you
Frequently Asked Questions
Why are the leftover pixels always added to the last panel?
Most of the time, the original height doesn't divide evenly by the number of panels, so there's a remainder (for example, 5000÷9=555…5). If you just drop that remainder, a few pixels at the bottom of the original get cut off. So the remainder is added to the last panel to make sure you don't lose a single pixel of the original.
How much taller is the final image with each of the three spacing modes?
Spacing between panels only adds (number of panels − 1) × spacing. Spacing at the bottom of every panel adds number of panels × spacing. Spacing at the top and bottom of every panel adds (number of panels + 1) × spacing. With 9 panels and 40px spacing, the final image grows by 320px, 360px, and 400px compared with the original, respectively.
Does this calculator actually slice image files?
No. This calculator doesn't upload or process actual image files. It only calculates coordinates from the width, height, number of panels, and spacing you enter. To do the actual slicing, move the calculated coordinates into Photoshop guides or run the generated ImageMagick script in your terminal.
Do I have to add spacing between panels?
Spacing is optional. If you set it to 0, you get the same coordinates as placing the panels back to back with no gaps. If you enter a value, the output coordinates and total height increase by that amount. The calculator computes and shows the coordinates for both cases.
This article was adapted from our Korean original. Read the Korean original