
Social Media Image Compression Guide: Size Limits by Platform
Contents
When you upload images to major social platforms like Instagram, YouTube, Twitter (X), and LinkedIn, each platform re-compresses them to fit its own CDN specs. Text and graphic edges often get smeared or noisy in the process, so it's worth checking the recommended resolution and file size before you upload. This post covers why re-compression damage happens and how to prepare images for each platform.
Summary ① Social platforms re-compress uploaded images to their own CDN specs, and image quality can suffer in the process. ② You can gauge the compression rate and the amount of quality loss from the size and pixel differences between the original and the compressed file. ③ Matching the recommended resolution and color profile for each platform ahead of time reduces re-compression damage.
Why images get smeared
Each social platform force-recompresses the large images you upload to fit its own CDN specs. Text and graphic edges often get smeared and noise appears in the process. The recommended file size limits differ by platform and content type (for example, Instagram feed is 8MB or less, Stories and Reels are 30MB or less, YouTube thumbnails are 2MB or less), but in general, checking the horizontal resolution (1080px–1200px) and the WebP/PNG-8 compression method in advance reduces this kind of damage.
How compression rate and quality loss are calculated
You can calculate the compression rate by comparing the original file size with the size after compression.
Compression rate (%) = (1 − compressed size ÷ original size) × 100
For example, if the original file is 3,000KB and it becomes 900KB after compression, (1 − 900 ÷ 3,000) × 100 = 70%, meaning the file size dropped by 70% compared with the original. The higher the compression rate, the smaller the file, but the greater the chance of quality loss.
How much quality was preserved is sometimes measured with PSNR (Peak Signal-to-Noise Ratio), which compares pixel value error between the original and the compressed file. PSNR (dB) = 10 × log₁₀(MAX² ÷ MSE), where MAX is the highest value a pixel can take (255 for 8-bit images) and MSE is the mean squared pixel error between the original and the compressed file. The higher this value, the closer the compressed image looks to the original.
That said, these compression rate and PSNR calculations are general indicators you can reference when you actually compress an image and compare the results. The tool introduced below does not compress files or calculate PSNR — it's a simple pre-check tool that compares the width and height pixel values you enter against platform recommended specs and aspect ratios.
How to reduce re-compression damage
Applying the methods below before you upload can reduce the damage caused by re-compression.
Lock in the sRGB color profile
Photos exported in Adobe RGB or the P3 color space often look duller once they're on social platforms. If you lock the color space to the sRGB IEC61966-2.1 profile when exporting, the original colors stay the same even on smartphones.
Export text-heavy images as PNG
For card news or thumbnails with a lot of text, using the JPEG format makes ringing stand out around text edges. The PNG format or WebP lossless mode helps keep things sharp.
Resize and compress right in the browser
Here's JavaScript code that uses the HTML5 Canvas toBlob method to resize and compress an image to WebP at 85% quality.
function compressSocialImage(imageFile, targetWidth, quality = 0.85) {
  return new Promise((resolve) => {
    const img = new Image();
    img.src = URL.createObjectURL(imageFile);
    img.onload = () => {
      const canvas = document.createElement('canvas');
      const ctx = canvas.getContext('2d');

      // 1. Resize while keeping the aspect ratio
      const scale = targetWidth / img.width;
      canvas.width = targetWidth;
      canvas.height = img.height * scale;

      ctx.drawImage(img, 0, 0, canvas.width, canvas.height);

      // 2. Convert to WebP at 85% quality
      canvas.toBlob((blob) => {
        resolve({
          blob: blob,
          compressedUrl: URL.createObjectURL(blob),
          sizeKb: Math.round(blob.size / 1024),
          dimensions: canvas.width + 'x' + Math.round(canvas.height)
        });
      }, 'image/webp', quality);
    };
  });
}
Note If you'd rather not write code yourself or open an image editor, you can just enter the width and height pixel values of the image you plan to upload and compare them against each platform's recommended specs right away.
If writing your own resizing code or checking color profiles one by one feels like a hassle, just enter the image's width and height pixel values and see right away whether it passes platform specs.
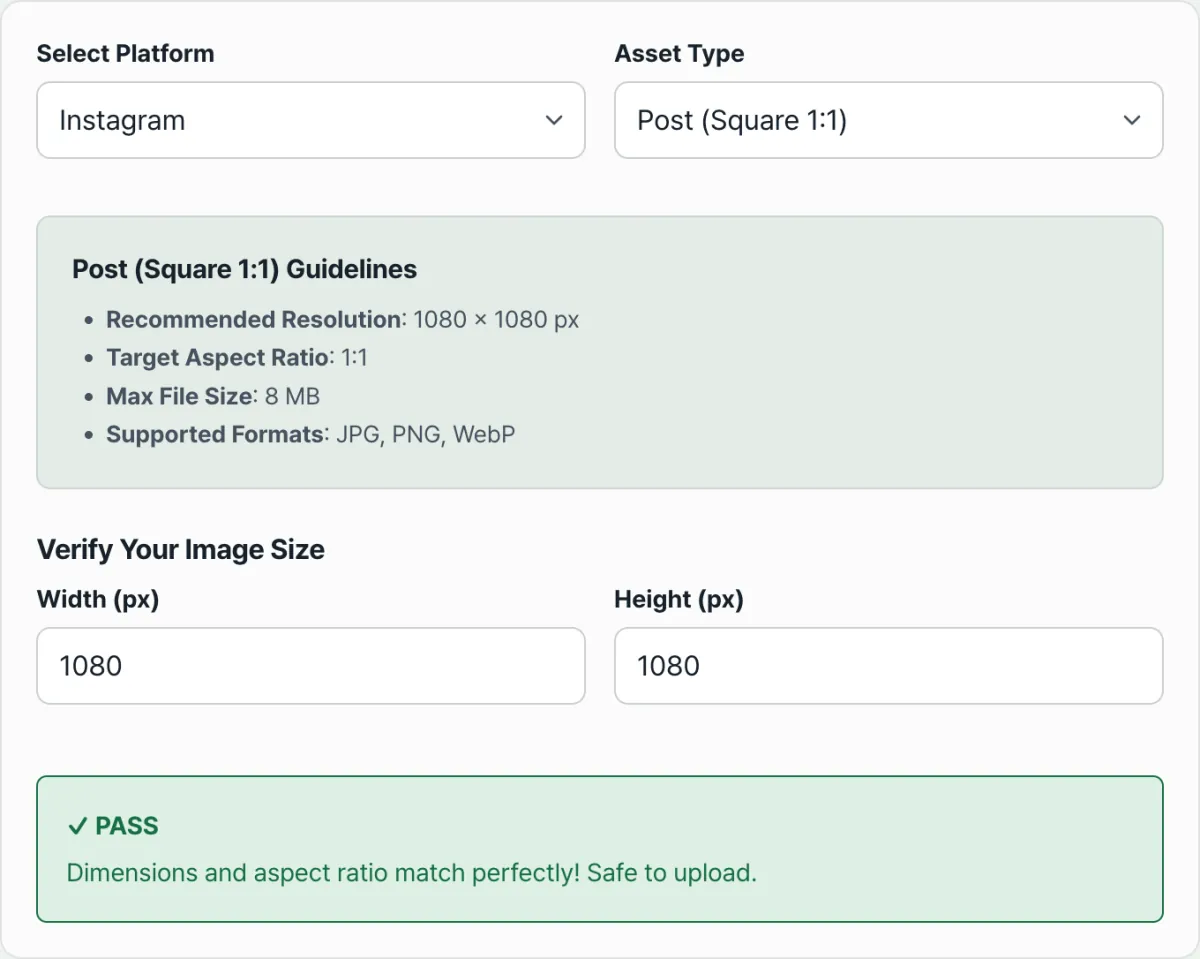
Enter just your width and height values to see right away whether your image matches the recommended resolution and file size limits for Instagram, YouTube, X, LinkedIn, and other platforms — you'll get an instant PASS or WARNING.
Image specs for major social platforms
- Instagram: 1:1 feed is 1080x1080, 4:5 feed is 1080x1350, Stories and Reels (9:16) are 1080x1920, formats are JPG/PNG/WebP, file size is 8MB or less for feed and 30MB or less for Stories and Reels
- YouTube Thumbnail: 16:9 1280x720px, file size 2MB or less
- Twitter/X (Header & Feed): feed 16:9 1200x675px, header cover 1500x500px
Wrapping up
Social platforms re-compress uploaded images to their own CDN specs, and text and graphics can get smeared in the process. Locking in the sRGB color profile, exporting text-heavy images as PNG, and resizing to the recommended resolution are enough to cut re-compression damage considerably. If looking up specs and doing the math every time is a hassle, it's easier to check ahead of time with our free Social Media Image Guide & Optimizer.
Enter just your width and height values to see right away whether your image matches the recommended resolution and file size limits for Instagram, YouTube, X, LinkedIn, and other platforms — you'll get an instant PASS or WARNING.
Frequently asked questions
Can I upload an image that's much larger than the recommended resolution?
Yes. Uploading an image at a higher resolution while keeping the same aspect ratio as the recommendation is better for high-quality output, so it passes (PASS) with no problem.
Do I need to actually upload an image to check the specs?
No. Just enter the image's width and height in pixels. You can check whether it passes the specs right away without uploading any file.
Which social platforms and content types can I check?
You can pick major platforms like Instagram, YouTube, X (Twitter), and LinkedIn, along with content types on each platform (such as YouTube thumbnails or Instagram feed), and check the specs.
What do PASS and WARNING mean on the results screen?
If the width and height values you entered match the selected platform's recommended specs and aspect ratio, it shows PASS; if they fall outside the specs, it shows WARNING. You can also see each platform's file size and format constraints alongside.
I want to gather reference images from other pages all at once
When you want to collect competitor content or reference material page by page, use the bulk webpage image downloader. Just enter a page URL and it finds up to 200 images on that page and lists them, so you can pick only the ones you need and download them as a ZIP.
This article was adapted from our Korean original. Read the Korean original