
Twitch Clip Download vs VOD: Why Only Clips Save as MP4
Contents
- Why Is It So Confusing That Clips Work but VODs Don't?
- How to Check It Yourself, Manually or Officially
- Clips vs. VODs: Why the Technical Difference Exists
- Quality, Format, and Case Comparison
- Where People Get Stuck
- Copyright and Legitimate Use
- How is this different from similar tools and platforms?
- Summary
- Frequently asked questions
The highlight that just happened on Twitch can be turned into a clip, and you can pick a quality and save it straight to MP4. But try to grab the full multi-hour VOD of the same broadcast the same way, and you hit a wall. Plenty of people found this article after pasting a VOD URL or a channel homepage URL into a clip downloader and getting the same "that's not a clip URL" message over and over. The difference isn't something Twitch blocks by policy — it's a structural result of clips and VODs being stored as different file formats from the start. This article walks through why that is, and how far you can actually save.
Summary ① A clip is a short highlight segment that's already encoded as a single finished file, so MP4 download links for each quality exist right away. ② A VOD is stored as small streaming segments (HLS) for playback, so there's no single file to download. ③ That's why pasting a channel homepage or VOD URL into a clip downloader doesn't work — it only recognizes clip URLs that contain /clip/.
Why Is It So Confusing That Clips Work but VODs Don't?
If you watch a lot of Twitch, you've probably run into this. You clip a moment from a streamer you like, paste the URL into a clip downloader to share it with a friend, and download buttons for each quality show up immediately. So far, no problem.
The problem comes next. You want to rewatch the full broadcast that same streamer did yesterday, so you open one video from the past broadcasts list on their channel page and paste that URL into the same tool. This time, no quality list appears — or you just get a message saying the URL format doesn't match.
Both videos live on Twitch and both look like "videos," so it's easy to wonder why only one of them works. Pasting a channel homepage URL (say, twitch.tv/streamername) gets you the same "that's not a clip URL" message. Clip links, VOD links, and channel homepage links look similar at a glance, but inside Twitch they point to completely different kinds of resources, and that difference is exactly what decides whether something can be saved.
It gets more confusing because clips and VODs often sit side by side on the same screen. On a single channel page you can bounce between the Clips tab and the Videos tab, so on the surface both feel like the same video content Twitch provides. But a video you open from the Clips tab and a video you open from the Videos tab go through entirely different URL structures and entirely different storage paths on the server.
You can't spot the difference just by looking at the player. Both screens have the same play button, timeline, and quality menu, and both play smoothly. There's no way to tell from the interface alone whether a video is one finished file or a set of playback segments stitched together in real time. That difference lives in the server's storage structure, not in what you see, so it makes sense that you can't notice it until you actually paste the URL into a downloader.
There's a reason this misunderstanding happens. Clips are usually made by picking a good moment out of a VOD or a live stream, so it's natural to assume that the moment is already inside the VOD and the VOD could just be trimmed and downloaded the same way. But the moment a clip is created, Twitch re-saves that short segment as finished files per quality, separate from the original streaming segments. VODs don't go through that extra save step, so they keep the original streaming segment form. So even though it looks like the same moment on screen, what's actually stored on the server was a different file from the beginning.
Search "Twitch VOD download" online and you'll find plenty of tools, but when you actually paste a VOD URL, many of them won't process it or will just throw an error. That isn't a flaw in any one tool — it's because of the format difference described above, there's simply no per-quality single MP4 link to find. If you try tool after tool and get the same result, the accurate read is that it's a limit of VODs as a content type, not a performance problem with the tool.
A lot of people first mistake this for a tool problem or a temporary network glitch. They try refreshing, they try another browser, they change their connection, and the result is the same. That's because it has nothing to do with your connection or how polished the tool is. The finished per-quality file you're looking for doesn't exist on the server in the first place, so no matter how stable your setup is, you can't find something that isn't there.
The workaround most people reach for at that point is screen recording. You play the VOD and capture the whole screen with a recording program. In principle this can save any video, but you have to record for the full runtime, the quality depends on your recording settings, and you can end up capturing the Twitch player's loading screen or ad breaks. Compared to grabbing a finished file off the server the way you do with clips, it's a big difference in both output quality and time spent.
How to Check It Yourself, Manually or Officially
You can verify that a clip has a real download link using nothing but a browser — no extra tools. Here's the order, for anyone who wants to understand the mechanics before using a downloader. Once you've done it by hand, you'll know what to check on your own the next time you run into a similar situation with a different video.
- Open the clip you want to save in the player, then copy the URL straight from the address bar. It should either start with clips.twitch.tv, or be a /clip/ URL that appears when you play the clip on a channel page.
- Open your browser's developer tools with F12, or right-click and choose "Inspect." Go to the Network tab, then narrow the request type to "Media" — the list gets much shorter.
- With that open, replay the clip from the start, and video file URLs for each quality will show up in the request list.
- Paste one of those URLs into a new tab. You'll get a page that plays only the video, and "Save as" will save the MP4 at that quality as is.
- If you want another quality, change the quality setting and repeat the process for each newly requested URL.
This method assumes a desktop browser. On mobile apps and mobile browsers you often can't even open developer tools, so it's easier to move to a PC to save a clip.
The method works without any special tool, but it's a hassle: for every quality you have to open developer tools, dig through the request list, and pick out the actual video file URL again. If you're not used to telling which request is the real video and which is a thumbnail or subtitle asset, it can take a while.
If you try the same method out of curiosity on a VOD page, the pattern looks clearly different from a clip. Instead of one request per quality, new requests with similar names keep appearing while the video plays. The requests grow as playback continues, and as long as you don't stop playing, a single request you could call "the file with the whole video" never shows up. What you're seeing on that screen is direct proof of the streaming segment structure described in the next section.
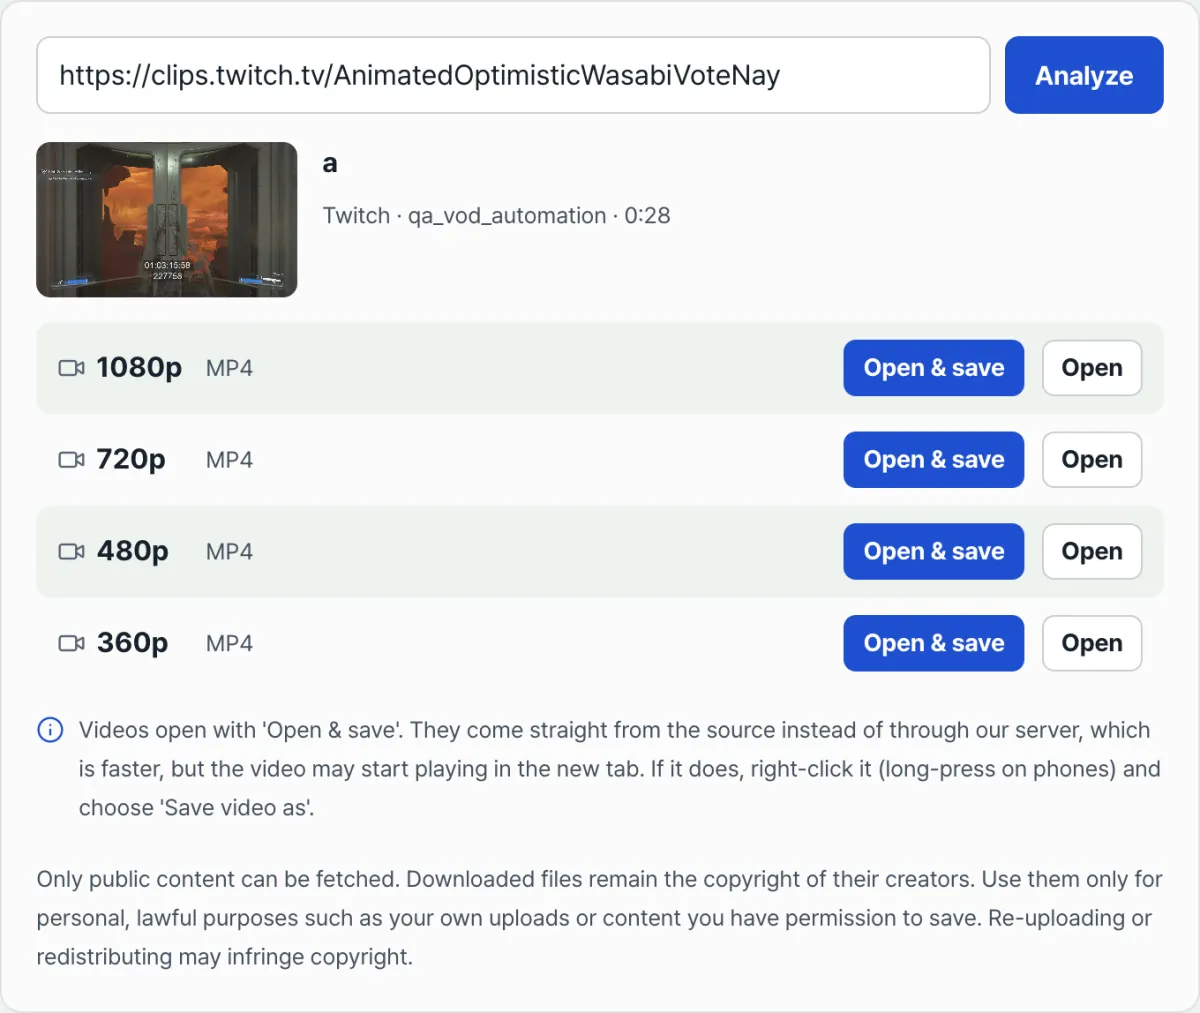
That repeated work is exactly what a downloader takes off your hands: paste one clip URL and it finds and lists every quality that exists in one go. Paste the URL, hit analyze, and Twitch Clip Downloader: Save 1080p MP4 pulls out the clip slug, lists the qualities available from 1080p down to 360p, and all you do is click save on the one you want. The saved MP4 opens in most video players right away, with no extra software installed.
Free, no login needed. Paste a clip URL and it finds MP4 links for every quality, from 1080p down to 360p.
Clips vs. VODs: Why the Technical Difference Exists
It's easy to get confused if you think this difference exists because "Twitch only puts effort into clips." The more accurate view is that content is created and consumed differently for clips and VODs, so the file format is decided differently from the start. To understand it, start with how Twitch stores each one. Our free tool, Twitch Clip Downloader: Save 1080p MP4, works by pulling the clip slug (the unique identifier for a clip) out of a clips.twitch.tv URL or a channel page URL that contains a /clip/ path. It then uses that slug to check whether MP4 files exist for each quality. Run a clip through this process and you'll find MP4 links at 1080p, 720p, 480p, and 360p, four quality levels in total. In other words, a clip already exists as finished files, encoded in several qualities at the moment it was created.
A VOD is stored differently. A live stream that runs for hours has to let a viewer who joins at any second start playing right away, switch quality without a hiccup, and seek to the middle without breaking. To meet those conditions, live streaming doesn't build one file from start to finish. It cuts the video into short segments and delivers them with a playlist that tells the player what order to play them in. This streaming-only format is commonly called HLS.
A VOD keeps that segmented streaming format after the broadcast ends. So when a player plays a VOD, it doesn't open one continuous file. It reads the playlist and stitches the needed segments together in order as it goes. On screen it looks like one smooth video, but what's actually stored on the server is a set of segment files plus a playlist that gives their order. In that structure, a "single MP4 file URL for this quality of the VOD" doesn't exist in the first place, so looking up per-quality MP4 links the way a clip tool does simply doesn't work.
MP4 is a container format, a box that bundles video, audio, subtitles, and other data into a single file. If you have that one file, it holds everything playback needs, so you can download it and watch from start to finish with no internet connection. A structure made of streaming segments and a playlist, by contrast, is designed around downloading and stitching only the part playing at that moment. Save the segments and the playlist separately and you still don't have a single complete video file. A clip existing as per-quality MP4 means it has already been repackaged into that container format. A VOD not being that way means it's still the raw streaming state, before that packaging step.
Segmentation is also what makes smooth quality switching work. The picture keeps going when your connection suddenly slows down or speeds up because the video is already prepared in small segments, so the player can pick segments at the right quality and join them. Streaming usually prepares segments for each quality separately and switches to a different quality mid-playback as your connection changes. For that switch to be smooth, the video has to exist as small segments. One merged, finished file can't switch in real time. The reason VODs keep the segmented structure after the broadcast ends is that seeking to a point or changing quality has to work the same way during VOD playback.
A clip is just a short stretch cut from the live stream, but Twitch doesn't keep the original stream segments when it makes one. It re-encodes that stretch per quality into standalone finished files. Clips (short highlights) get shared a lot and replayed at many screen sizes, so preparing a few finished files upfront is more practical for running the service than stitching streaming segments together every time. Building an entire multi-hour VOD as one file per quality, on the other hand, costs far more storage and processing than clips ever could. That's why VODs keep the segmented streaming format.
The numbers attached to quality labels reflect that encoding too. If the source was recorded at 60fps when the clip was made, the quality label shows 60 as well (e.g., "60p" as in 1080p60). That means the encoded file's frames-per-second information comes attached along with the quality info, and if the source isn't 60fps, the label doesn't appear. Just like the quality options, this label only shows what Twitch actually encoded when it made the clip. The tool doesn't guess or calculate it.
The strict URL requirement comes from the same place. To pull out a clip slug, the slug has to actually be in the URL, and a channel home URL or a VOD URL doesn't contain one. Put one of those in and you get a message that the slug can't be extracted. That's not a restriction the tool made up. It falls out of how the URLs are built. In the end, "clips work but VODs don't" comes down to one cause: a finished single file versus a segmented streaming format.
So the dividing line isn't what the URL points to. It's what form the content behind that URL is stored in on the server. Two videos can live on the same Twitch service and look alike, yet the outcome splits completely depending on whether one is pre-built as a finished single file or exists only as playback segments. Hold onto one rule, that only clip URLs are recognized, and you won't have to puzzle out which links work every time.
Format differences like this aren't unique to Twitch. Download tools for other video platforms, for example, sometimes return a message like "this video is only available as a stream" instead of a per-quality MP4 link. The principle holds. If a video is stored only as streaming segments rather than a finished single file, no direct per-quality MP4 link exists, no matter the platform. Twitch's clip-versus-VOD split is that same general pattern showing up within one service, divided by content type.
This is unwelcome news if you want to save a whole VOD as one file, but it's not something a small tool improvement can fix. Finding segmented streaming files in order and joining them is a completely different kind of engineering from looking up the URLs of finished per-quality files. That's why this tool focuses on accurately finding clips that already exist as finished files.
The longer the broadcast, the more segment files a VOD needs. A stream that runs for hours means that many segments listed in the playlist, and re-encoding them into a single finished file per quality adds storage space and processing time to match. Clips are short to begin with, so pre-encoding finished files per quality is a comparatively small burden. That difference in scale sits behind the different storage strategies clips and VODs ended up with.
Quality, Format, and Case Comparison
Here's everything covered so far, sorted by quality, format, and whether it's supported. Clips and VODs are both Twitch content, but they get saved in different ways, so putting them side by side in a table makes the gap obvious.
| Category | Clip | VOD |
|---|---|---|
| Stored format | A finished single MP4 file | Small streaming segments (HLS) plus a playlist |
| Length | A short highlight segment | The entire broadcast (hours, in the long case) |
| Supported by this tool | Supported | Not supported |
| URL format required | A clips.twitch.tv URL, or a URL containing /clip/ | A VOD-only URL |
| Qualities returned | 1080p, 720p, 480p, 360p (with a 60 label if the source is 60fps) | No finished per-quality file exists at all |
| Save process | Pick a quality, and it saves as MP4 right away | Can't be saved directly as a single file |
| If you enter a channel home URL | Not processed, because the URL format is different | Likewise not processed |
| When it's created and saved | Encoded per quality the moment the highlight segment is made | Segments are created and pile up in real time during the broadcast |
As the table shows, the two types split apart before you even get to quality numbers or save steps. The difference sits in what the original file looks like when it's stored. Once you get that, it makes sense why entering a channel home URL or a VOD URL only gets you a message instead of a download.
Take the "Qualities returned" row a bit further. For clips, the answer is fixed by specific numbers: 1080p, 720p, 480p, 360p. For VODs, the question "how many qualities are there" doesn't really apply in the first place. The VOD player does show a quality menu, but that's only a choice about which quality of streaming segment to pull while playback runs. It doesn't mean a finished single file at that quality exists somewhere. That's the key point this table is making: the quality menu you see on screen and the list of qualities you can actually save as one file are two different things.
Where People Get Stuck
Here are the spots where people actually get stuck while using Twitch Clip Downloader: Save 1080p MP4. Most of these aren't errors. They're normal behavior that comes from the URL format or from how the original clip was made.
| Symptom | Cause | Fix |
|---|---|---|
| I pasted a channel home URL and got "Not a clip URL" | A channel home URL doesn't contain a clip slug | Open the clip and copy the URL containing /clip/ exactly as shown |
| I pasted a VOD URL and no qualities came back | A VOD is streaming segments (HLS), so there's no per-quality single MP4 link | VODs aren't supported, so clip the part you want first, then use that clip's URL |
| 1080p isn't in the quality list | The original clip was recorded and saved at a lower quality to begin with | Pick the highest quality listed |
| A strange 60 is attached to the quality label | The source clip was recorded at 60fps, so 60 shows up with the quality info | It's not an error, it's a normal label — just save it as is |
| I pasted a clip URL and it still isn't recognized | It may be a shortened URL from a mobile app's share feature, which differs from the browser address bar format | Open the clip in a browser yourself and copy the real URL from the address bar |
| URLs copied from a channel's search results don't work | Links in the list view sometimes point somewhere other than the clip detail page | Go all the way into the screen that plays the clip, then copy the URL from there |
| I hit save and nothing happened | Your network may be slow, or you copied the URL before the clip page fully loaded | Let the clip page finish loading, copy the URL again, and re-analyze |
If you hit a problem that isn't in this table, it almost always comes down to a URL format issue. The fastest fix is to check again whether the URL you pasted actually contains /clip/.
To unpack the first two rows a little more: the channel home URL problem and the VOD URL problem look similar on the surface, but the causes are different. With a channel home URL, you haven't even specified which clip you mean. With a VOD URL, you've specified it, but there's no per-quality single file to begin with. The first one clears up as soon as you go back to the clip page. The second won't clear up no matter how accurately you paste the URL, so the practical workaround is different. To solve the second, you eventually have to clip the part of that VOD you want, on Twitch, as a new clip.
Copyright and Legitimate Use
The clips you can get with a download tool are limited to public clips that anyone can view without logging in. Clips set to private, deleted clips, and content shared only with certain viewers won't have a page at all, so no qualities come back either. This rule applies to clips and to any other media download tool.
The copyright on a downloaded clip file belongs to the streamer who ran the broadcast and to Twitch, not to the person who used the tool. Being able to save a clip doesn't mean you're free to use that video however you want. The save button working means you can technically pull the file. It doesn't automatically grant you permission for how you use it afterward, and that distinction matters. The safe route is to use it only for personal, lawful purposes — a clip from a broadcast you ran yourself, or a case where you have the copyright holder's permission.
In particular, re-uploading a saved clip to another platform exactly as-is, or redistributing it commercially, can count as copyright infringement. Anything beyond keeping it for your own viewing or backing it up on your own device should stay within the permission the original creator gives you. Unless you're a streamer downloading your own clips to edit and reuse, think once more about where the file is going before you use it.
Clips can also contain more than the streamer who ran the broadcast. Chat participants and guests who appeared alongside them may have their voices or faces in the clip. When you use a saved clip, it's worth keeping those third parties in mind as well.
Streamers saving their own clips to review their broadcasts or to gather material for a highlight reel is a fairly clearly safe use case. On the other hand, putting together other streamers' clips to run a separate channel, or reusing them in content tied to ad revenue, carries a lot of risk without talking to the copyright holder first.
Above all, being able to use a download tool doesn't substitute for the copyright holder's permission. The safest standard is to stay within uses that don't infringe the original creator's rights — personal archiving, offline viewing, or re-editing clips from a broadcast you ran yourself.
The same goes for stitching several clips together into a new video. Each clip may have a different creator, so before you publish the edit, check one by one whether each clip in it needs permission. A download tool only handles finding and fetching per-quality files for you. Responsibility for how you use them afterward is yours.
How is this different from similar tools and platforms?
Video and image download tools face different problems depending on the platform. A Pinterest image and video saving tool, for example, deals with the fact that the thumbnail shown on screen and the actual original resolution are stored separately. It serves the original when one exists and otherwise reports the displayed size instead. A Bluesky photo and video saving tool faces the opposite situation: public posts can be read without logging in, so access itself is simple, but the real work is pinpointing the original file attached to the post.
An X (Twitter) video saving tool handles yet another problem. X pre-converts uploaded videos into several resolutions, so a single tweet URL can produce a list of several qualities. Here, complete files for each quality already exist, which makes the principle similar to Twitch clips — but there's an added need to filter out content you can't access at all, such as locked (private) accounts.
A Naver TV video saving tool works by showing the file size for each quality along with the quality itself. That's only possible because this content, like clips, has complete per-quality files prepared in advance. Live broadcasts themselves aren't supported, and it can only handle clips registered as replays — a limitation in the same spirit as Twitch's clip-versus-VOD distinction.
A Vimeo video saving tool runs into this problem in a slightly different way. A download link retrieved from Vimeo expires after a certain amount of time and has to be analyzed again, and some videos are offered for streaming only, with no per-quality MP4 link in the first place. Links going dead after a while differs from Twitch clips, but the principle that "streaming-only means no complete file link" is exactly the same logic as the clip-versus-VOD distinction explained in this post.
The problem a Twitch clip saving tool faces is a different kind altogether. Within Twitch itself, two kinds of video are mixed together — clips and VODs — and they're stored in formats that differ from each other. The tool can only handle clips, which exist as a single finished file. In other words, the question isn't "where do I find the original" but "does this content exist as a single file at all?" — that has to be sorted out first.
Handling VODs would require a separate process that stitches streaming segments together in order, which is a fundamentally different approach from the current method of looking up links to complete per-quality files. Across all these cases, download tools end up facing one basic question: "Does this video exist as a single finished file, or only as streaming segments for playback?" Twitch clips and VODs are a case where both exist inside the same service, which is why on a single channel page some videos work and others don't. It's also why, when you pick a saving tool, you should first check which kinds of content on that platform it supports.
From that angle, the trick to using a Twitch clip saving tool well is simple. If you spot a moment you want to save, it's faster and more reliable to get in the habit of making that segment into a clip first, rather than trying to download straight from the VOD view. Once it's a clip, per-quality MP4 links exist right away, which makes it much easier to find and save later. If you're not in a hurry, making clips first and cleaning them all up later is a good habit that keeps you from missing moments.
Summary
Here's a recap of what we've covered so far.
- A clip is a finished file with a short highlight pre-encoded at each quality, so an MP4 download link exists immediately.
- A VOD is stored as streaming segments (HLS) chopped up for playback, so it can't be downloaded as a single file. That's not a limitation of the tool — it's a structural difference in the format itself.
- A clip saving tool only accepts a clips.twitch.tv URL or a URL containing /clip/. Channel home pages and VOD URLs have no clip slug, so they aren't recognized.
- The qualities listed are four levels: 1080p, 720p, 480p, and 360p. If the source is 60fps, a 60 is shown alongside the quality label.
- Copyright in a saved clip belongs to the original creator, so use it only for personal, lawful purposes and avoid unauthorized re-uploads or redistribution.
Free, no login needed. Paste a clip URL and it finds MP4 links for every quality, from 1080p down to 360p.
Frequently asked questions
Will VODs be supported later?
Right now only clips are supported. VODs are stored in a streaming segment (HLS) format chopped up for playback, so the current approach — looking up a single MP4 link per quality — can't handle them. Stitching segments together in order is a completely different area of engineering, so if there's a section you want to save, the surest method today is to make that section into a clip first and then use the clip URL.
Where exactly do I copy the clip URL from?
Copy the URL shown in your browser's address bar while the clip is playing. It has to start with clips.twitch.tv, or contain /clip/ as it appears when you open a clip from a channel page. Channel home URLs, VOD URLs, and search results page URLs don't contain the unique identifier (slug) that distinguishes a clip, so they won't be recognized. You need to go all the way into the clip playback screen and copy the URL there.
Why is 1080p sometimes missing from the quality list?
The qualities listed match only what was actually encoded when that clip was created. If the original broadcast quality was low, or the clip was saved at a low quality at the time it was made, a 1080p option may not exist at all. That means the tool isn't dropping a quality — Twitch's servers simply don't have a file at that quality. In that case, just pick the highest quality shown. Even for the same streamer, the original quality can vary from clip to clip, so the list may look a little different each time.
What does the "60" in a quality label mean?
It means the original clip was recorded at 60fps (60 frames per second). Clips recorded at 60fps show a 60 alongside the quality label (for example, 1080p60), telling you it's high-frame-rate video with smoother motion. If the source isn't 60fps, this marker doesn't appear — that's not an error, it just reflects the original recording settings. It can appear or not appear on any quality, so it isn't tied to a specific one.
Why doesn't a channel home URL work?
Because a channel home URL doesn't contain the unique identifier (slug) that points to a specific clip. The tool works by extracting the slug from the URL and looking up the MP4 for each quality, so if you enter a URL without /clip/ in it, you'll just get a notice that it isn't a clip URL and nothing else happens. Open the clip you want from the channel page, then copy the URL from that screen and try again.
Can I upload a saved clip to YouTube or other social media?
We don't recommend it. Copyright in a clip belongs to the streamer who did the broadcast and to Twitch, not to the person who saved it. Re-uploading or redistributing it on another platform without the original creator's permission can infringe copyright. You also have to consider the other viewers or guests who appear in the clip. It's safest to use it only for personal archiving or viewing. If you really need to reuse it, asking the original creator for permission first is the surest route.
Is the downloaded quality the same as what I see on Twitch?
Yes. The quality list points to the per-quality MP4 files Twitch actually encoded for that clip. The tool doesn't compress or re-encode anything separately — it fetches the file from the retrieved link as-is, so you get exactly the quality you selected. If the source was encoded at 60fps, the saved file keeps that frame rate too, so you can keep the same quality you were watching on screen.
This article was adapted from our Korean original. Read the Korean original